2

Pcaprub installation on Win 10 x64

-

If you encounter the following error, the issue is pcaprub uses a hardcoded path for Winpcap.  I downloaded winpcap v4.1.3 and downloaded the dev kit for Winpcap and put it in c:\WpdPack.   Additionally, since I use an x64 machine I had to copy the file C:\WpdPack\Lib\x64\*.lib into C:\WpdPack\Lib and then the compilation worked.

You need pcaprub for things like msf.


C:\dev\kit>gem install pcaprub
Temporarily enhancing PATH for MSYS/MINGW...
Building native extensions. This could take a while...
ERROR: Error installing pcaprub:
ERROR: Failed to build gem native extension.

current directory: C:/Ruby24-x64/lib/ruby/gems/2.4.0/gems/pcaprub-0.13.0/ext/pcaprub_c
C:/Ruby24-x64/bin/ruby.exe -r ./siteconf20181112-2628-1wqgu6f.rb extconf.rb

[*] Running checks for pcaprub_c code...
platform is x64-mingw32
checking for -lws2_32... yes
checking for -liphlpapi... yes
checking for windows.h... yes
checking for winsock2.h... yes
checking for iphlpapi.h... yes
checking for ruby/thread.h... yes
checking for rb_thread_blocking_region()... no
checking for rb_thread_call_without_gvl()... yes
checking for pcap_open_live() in -lwpcap... no
checking for pcap_setnonblock() in -lwpcap... no
creating Makefile

current directory: C:/Ruby24-x64/lib/ruby/gems/2.4.0/gems/pcaprub-0.13.0/ext/pcaprub_c
make "DESTDIR=" clean

current directory: C:/Ruby24-x64/lib/ruby/gems/2.4.0/gems/pcaprub-0.13.0/ext/pcaprub_c
make "DESTDIR="
generating pcaprub_c-x64-mingw32.def
compiling pcaprub.c
In file included from C:/WpdPack/include/pcap/pcap.h:41,
from C:/WpdPack/include/pcap.h:45,
from pcaprub.c:11:
C:/WpdPack/include/pcap-stdinc.h:64: warning: "snprintf" redefined
#define snprintf _snprintf

In file included from C:/Ruby24-x64/include/ruby-2.4.0/ruby/ruby.h:2429,
from C:/Ruby24-x64/include/ruby-2.4.0/ruby.h:33,
from pcaprub.c:1:
C:/Ruby24-x64/include/ruby-2.4.0/ruby/subst.h:6: note: this is the location of the previous definition
#define snprintf ruby_snprintf

In file included from C:/WpdPack/include/pcap/pcap.h:41,
from C:/WpdPack/include/pcap.h:45,
from pcaprub.c:11:
C:/WpdPack/include/pcap-stdinc.h:65: warning: "vsnprintf" redefined
#define vsnprintf _vsnprintf

In file included from C:/Ruby24-x64/include/ruby-2.4.0/ruby/ruby.h:2429,
from C:/Ruby24-x64/include/ruby-2.4.0/ruby.h:33,
from pcaprub.c:1:
C:/Ruby24-x64/include/ruby-2.4.0/ruby/subst.h:7: note: this is the location of the previous definition
#define vsnprintf ruby_vsnprintf

pcaprub.c: In function 'rbpcap_each_data':
pcaprub.c:992:9: warning: cast from pointer to integer of different size [-Wpointer-to-int-cast]
fno = (int)pcap_getevent(rbp->pd);
^
pcaprub.c:992:7: warning: assignment to 'HANDLE' {aka 'void *'} from 'int' makes pointer from integer without a cast [-W
int-conversion]
fno = (int)pcap_getevent(rbp->pd);
^
pcaprub.c: In function 'rbpcap_each_packet':
pcaprub.c:1034:9: warning: cast from pointer to integer of different size [-Wpointer-to-int-cast]
fno = (int)pcap_getevent(rbp->pd);
^
pcaprub.c:1034:7: warning: assignment to 'HANDLE' {aka 'void *'} from 'int' makes pointer from integer without a cast [-
Wint-conversion]
fno = (int)pcap_getevent(rbp->pd);
^
pcaprub.c: In function 'rbpcap_thread_wait_handle':
pcaprub.c:1274:7: warning: passing argument 1 of 'rb_thread_call_without_gvl' from incompatible pointer type [-Wincompat
ible-pointer-types]
rbpcap_thread_wait_handle_blocking,
^~~~~~~~~~~~~~~~~~~~~~~~~~~~~~~~~~
In file included from pcaprub.c:4:
C:/Ruby24-x64/include/ruby-2.4.0/ruby/thread.h:28:7: note: expected 'void * (*)(void *)' but argument is of type 'VALUE
(*)(void *)' {aka 'long long unsigned int (*)(void *)'}
void *rb_thread_call_without_gvl(void *(*func)(void *), void *data1,
^~~~~~~~~~~~~~~~~~~~~~~~~~
linking shared-object pcaprub_c.so
pcaprub.o:pcaprub.c:(.text+0x1a0): undefined reference to `pcap_lib_version'
pcaprub.o:pcaprub.c:(.text+0x1e0): undefined reference to `pcap_findalldevs'
pcaprub.o:pcaprub.c:(.text+0x2b8): undefined reference to `pcap_freealldevs'
pcaprub.o:pcaprub.c:(.text+0x32f): undefined reference to `pcap_lookupnet'
pcaprub.o:pcaprub.c:(.text+0x43d): undefined reference to `pcap_close'
pcaprub.o:pcaprub.c:(.text+0x45a): undefined reference to `pcap_dump_close'
pcaprub.o:pcaprub.c:(.text+0x67c): undefined reference to `pcap_set_timeout'
pcaprub.o:pcaprub.c:(.text+0x6ce): undefined reference to `pcap_list_datalinks'
pcaprub.o:pcaprub.c:(.text+0x707): undefined reference to `pcap_datalink_val_to_name'
pcaprub.o:pcaprub.c:(.text+0x76d): undefined reference to `pcap_free_datalinks'
pcaprub.o:pcaprub.c:(.text+0x782): undefined reference to `pcap_geterr'
pcaprub.o:pcaprub.c:(.text+0x828): undefined reference to `pcap_datalink_name_to_val'
pcaprub.o:pcaprub.c:(.text+0x895): undefined reference to `pcap_set_datalink'
pcaprub.o:pcaprub.c:(.text+0x8b3): undefined reference to `pcap_geterr'
pcaprub.o:pcaprub.c:(.text+0x93f): undefined reference to `pcap_set_snaplen'
pcaprub.o:pcaprub.c:(.text+0x9d4): undefined reference to `pcap_set_promisc'
pcaprub.o:pcaprub.c:(.text+0xae1): undefined reference to `pcap_lookupnet'
pcaprub.o:pcaprub.c:(.text+0xb57): undefined reference to `pcap_compile'
pcaprub.o:pcaprub.c:(.text+0xb6d): undefined reference to `pcap_geterr'
pcaprub.o:pcaprub.c:(.text+0xb9f): undefined reference to `pcap_setfilter'
pcaprub.o:pcaprub.c:(.text+0xbaf): undefined reference to `pcap_freecode'
pcaprub.o:pcaprub.c:(.text+0xbc1): undefined reference to `pcap_geterr'
pcaprub.o:pcaprub.c:(.text+0xbe9): undefined reference to `pcap_freecode'
pcaprub.o:pcaprub.c:(.text+0xc62): undefined reference to `pcap_compile'
pcaprub.o:pcaprub.c:(.text+0xc75): undefined reference to `pcap_geterr'
pcaprub.o:pcaprub.c:(.text+0xc9d): undefined reference to `pcap_freecode'
pcaprub.o:pcaprub.c:(.text+0xccf): undefined reference to `pcap_activate'
pcaprub.o:pcaprub.c:(.text+0xd33): undefined reference to `pcap_close'
pcaprub.o:pcaprub.c:(.text+0xe0b): undefined reference to `pcap_close'
pcaprub.o:pcaprub.c:(.text+0xe43): undefined reference to `pcap_create'
pcaprub.o:pcaprub.c:(.text+0x109e): undefined reference to `pcap_close'
pcaprub.o:pcaprub.c:(.text+0x110d): undefined reference to `pcap_open_live'
pcaprub.o:pcaprub.c:(.text+0x129f): undefined reference to `pcap_open_offline'
pcaprub.o:pcaprub.c:(.text+0x1419): undefined reference to `pcap_open_dead'
pcaprub.o:pcaprub.c:(.text+0x1532): undefined reference to `pcap_dump_open'
pcaprub.o:pcaprub.c:(.text+0x15d9): undefined reference to `pcap_dump_close'
pcaprub.o:pcaprub.c:(.text+0x171e): undefined reference to `pcap_dump'
pcaprub.o:pcaprub.c:(.text+0x17e7): undefined reference to `pcap_sendpacket'
pcaprub.o:pcaprub.c:(.text+0x17fa): undefined reference to `pcap_geterr'
pcaprub.o:pcaprub.c:(.text+0x18ea): undefined reference to `pcap_setnonblock'
pcaprub.o:pcaprub.c:(.text+0x1912): undefined reference to `pcap_dispatch'
pcaprub.o:pcaprub.c:(.text+0x19fd): undefined reference to `pcap_setnonblock'
pcaprub.o:pcaprub.c:(.text+0x1a25): undefined reference to `pcap_dispatch'
pcaprub.o:pcaprub.c:(.text+0x1b35): undefined reference to `pcap_getevent'
pcaprub.o:pcaprub.c:(.text+0x1be3): undefined reference to `pcap_getevent'
pcaprub.o:pcaprub.c:(.text+0x1c91): undefined reference to `pcap_datalink'
pcaprub.o:pcaprub.c:(.text+0x1cdc): undefined reference to `pcap_major_version'
pcaprub.o:pcaprub.c:(.text+0x1d27): undefined reference to `pcap_minor_version'
pcaprub.o:pcaprub.c:(.text+0x1d72): undefined reference to `pcap_snapshot'
pcaprub.o:pcaprub.c:(.text+0x1dca): undefined reference to `pcap_stats'
collect2.exe: error: ld returned 1 exit status
make: *** [Makefile:259: pcaprub_c.so] Error 1

make failed, exit code 2

Gem files will remain installed in C:/Ruby24-x64/lib/ruby/gems/2.4.0/gems/pcaprub-0.13.0 for inspection.
Results logged to C:/Ruby24-x64/lib/ruby/gems/2.4.0/extensions/x64-mingw32/2.4.0/pcaprub-0.13.0/gem_make.out


0

PCI SSC Forbids SSL and “Early TLS”

-

On April 15, 2015 the PCI SSC released the PCI DSS v3.1.  The main cause for concern for most merchants and other entities (called “entities” hereonforth) that store, transmit and process cardholder data is the prohibition of using SSL and “Early TLS”.  The PCI SSC also released a supplement to assist entities in mitigating the issue.   The supplement references the NIST guideline SP800-52 rev1 for determining which are good ciphers and which are not.

The key point being what does “Early TLS” mean?  Does it mean TLSv1.0 and TLSv1.1 OR does it mean only TLSv1.0?  Are the entities supposed to disable all ciphers except anything that’s TLSv1.2?

Answer is (in consultant speak) “it depends”. 🙂

TLSv1.1 does theoretically have ciphers that are not ideal.  Example: CBC mode ciphers that are TLSv1.1 but there may be a potential for attacks on them given that in the past couple of years CBC has fallen multiple times (BEAST, POODLE).

Google Chrome lists the use of CBC-based ciphers (despite the fact that they’re TLSv1.1) to be obsolete.  Google Chrome essentially makes “obsolete cryptography” a function of using TLS v1.2-based ciphers.

Untitled2

Firefox allows the configuration of disabling TLSv1.0 and that can be done by typing “about:config” in the address bar.  The security.tls.version.min = 0 (means SSLv3), 1 (means TLSv1.0), 2 (means TLSv1.1) and 3 (means TLSv1.2).  The following screenshot shows the configuration snapshot (here the lowest allowed version is TLSv1.0).

Untitled3

Let’s start with what is definitely ok for PCI:

https://www.openssl.org/docs/apps/ciphers.html#TLS-v1.2-cipher-suites

 TLS_RSA_WITH_NULL_SHA256                  NULL-SHA256
 TLS_RSA_WITH_AES_128_CBC_SHA256           AES128-SHA256
 TLS_RSA_WITH_AES_256_CBC_SHA256           AES256-SHA256
 TLS_RSA_WITH_AES_128_GCM_SHA256           AES128-GCM-SHA256
 TLS_RSA_WITH_AES_256_GCM_SHA384           AES256-GCM-SHA384

 TLS_DH_RSA_WITH_AES_128_CBC_SHA256        DH-RSA-AES128-SHA256
 TLS_DH_RSA_WITH_AES_256_CBC_SHA256        DH-RSA-AES256-SHA256
 TLS_DH_RSA_WITH_AES_128_GCM_SHA256        DH-RSA-AES128-GCM-SHA256
 TLS_DH_RSA_WITH_AES_256_GCM_SHA384        DH-RSA-AES256-GCM-SHA384

 TLS_DH_DSS_WITH_AES_128_CBC_SHA256        DH-DSS-AES128-SHA256
 TLS_DH_DSS_WITH_AES_256_CBC_SHA256        DH-DSS-AES256-SHA256
 TLS_DH_DSS_WITH_AES_128_GCM_SHA256        DH-DSS-AES128-GCM-SHA256
 TLS_DH_DSS_WITH_AES_256_GCM_SHA384        DH-DSS-AES256-GCM-SHA384

 TLS_DHE_RSA_WITH_AES_128_CBC_SHA256       DHE-RSA-AES128-SHA256
 TLS_DHE_RSA_WITH_AES_256_CBC_SHA256       DHE-RSA-AES256-SHA256
 TLS_DHE_RSA_WITH_AES_128_GCM_SHA256       DHE-RSA-AES128-GCM-SHA256
 TLS_DHE_RSA_WITH_AES_256_GCM_SHA384       DHE-RSA-AES256-GCM-SHA384

 TLS_DHE_DSS_WITH_AES_128_CBC_SHA256       DHE-DSS-AES128-SHA256
 TLS_DHE_DSS_WITH_AES_256_CBC_SHA256       DHE-DSS-AES256-SHA256
 TLS_DHE_DSS_WITH_AES_128_GCM_SHA256       DHE-DSS-AES128-GCM-SHA256
 TLS_DHE_DSS_WITH_AES_256_GCM_SHA384       DHE-DSS-AES256-GCM-SHA384

 TLS_ECDH_RSA_WITH_AES_128_CBC_SHA256      ECDH-RSA-AES128-SHA256
 TLS_ECDH_RSA_WITH_AES_256_CBC_SHA384      ECDH-RSA-AES256-SHA384
 TLS_ECDH_RSA_WITH_AES_128_GCM_SHA256      ECDH-RSA-AES128-GCM-SHA256
 TLS_ECDH_RSA_WITH_AES_256_GCM_SHA384      ECDH-RSA-AES256-GCM-SHA384

 TLS_ECDH_ECDSA_WITH_AES_128_CBC_SHA256    ECDH-ECDSA-AES128-SHA256
 TLS_ECDH_ECDSA_WITH_AES_256_CBC_SHA384    ECDH-ECDSA-AES256-SHA384
 TLS_ECDH_ECDSA_WITH_AES_128_GCM_SHA256    ECDH-ECDSA-AES128-GCM-SHA256
 TLS_ECDH_ECDSA_WITH_AES_256_GCM_SHA384    ECDH-ECDSA-AES256-GCM-SHA384

 TLS_ECDHE_RSA_WITH_AES_128_CBC_SHA256     ECDHE-RSA-AES128-SHA256
 TLS_ECDHE_RSA_WITH_AES_256_CBC_SHA384     ECDHE-RSA-AES256-SHA384
 TLS_ECDHE_RSA_WITH_AES_128_GCM_SHA256     ECDHE-RSA-AES128-GCM-SHA256
 TLS_ECDHE_RSA_WITH_AES_256_GCM_SHA384     ECDHE-RSA-AES256-GCM-SHA384

 TLS_ECDHE_ECDSA_WITH_AES_128_CBC_SHA256   ECDHE-ECDSA-AES128-SHA256
 TLS_ECDHE_ECDSA_WITH_AES_256_CBC_SHA384   ECDHE-ECDSA-AES256-SHA384
 TLS_ECDHE_ECDSA_WITH_AES_128_GCM_SHA256   ECDHE-ECDSA-AES128-GCM-SHA256
 TLS_ECDHE_ECDSA_WITH_AES_256_GCM_SHA384   ECDHE-ECDSA-AES256-GCM-SHA384

 TLS_DH_anon_WITH_AES_128_CBC_SHA256       ADH-AES128-SHA256
 TLS_DH_anon_WITH_AES_256_CBC_SHA256       ADH-AES256-SHA256
 TLS_DH_anon_WITH_AES_128_GCM_SHA256       ADH-AES128-GCM-SHA256
 TLS_DH_anon_WITH_AES_256_GCM_SHA384       ADH-AES256-GCM-SHA384
 TLS_ECDHE_ECDSA_WITH_CAMELLIA_128_CBC_SHA256 ECDHE-ECDSA-CAMELLIA128-SHA256
 TLS_ECDHE_ECDSA_WITH_CAMELLIA_256_CBC_SHA384 ECDHE-ECDSA-CAMELLIA256-SHA384
 TLS_ECDH_ECDSA_WITH_CAMELLIA_128_CBC_SHA256  ECDH-ECDSA-CAMELLIA128-SHA256
 TLS_ECDH_ECDSA_WITH_CAMELLIA_256_CBC_SHA384  ECDH-ECDSA-CAMELLIA256-SHA384
 TLS_ECDHE_RSA_WITH_CAMELLIA_128_CBC_SHA256   ECDHE-RSA-CAMELLIA128-SHA256
 TLS_ECDHE_RSA_WITH_CAMELLIA_256_CBC_SHA384   ECDHE-RSA-CAMELLIA256-SHA384
 TLS_ECDH_RSA_WITH_CAMELLIA_128_CBC_SHA256    ECDH-RSA-CAMELLIA128-SHA256
 TLS_ECDH_RSA_WITH_CAMELLIA_256_CBC_SHA384    ECDH-RSA-CAMELLIA256-SHA384

Now let’s see what may potentially be good from TLSv1.1 perspective (from NIST SP8000-52 rev1):

TLS_RSA_WITH_3DES_EDE_CBC_SHA           DES-CBC3-SHA
TLS_RSA_WITH_AES_128_CBC_SHA            AES128-SHA

Here’s a problem though per OpenSSL man page:
Untitled

If you’re using OpenSSL, how do you ensure that the browser is not negotiating the vulnerable TLSv1.0 ciphers? The only real answer seems to be by providing a cipher order for negotiation and hoping the client doesn’t cheat.  Most likely, the browser will negotiate a better cipher when it exists in the server and on the client and you’d avert the possibility of negotiation of a bad cipher.

According to experts, anything that uses CBC is inherently broken.  But disabling TLSv1.0 may make the server inaccessible to various older Android devices.  Also, if you’re using older Java Development Kits (JDK7 and below), do remember that the default ciphers may not hit the spot for PCI.

There’s an excellent site to help you configure each type of the server so you could become PCI compliant. This is an excellent site by Ivan Ristic to test your Internet-facing servers for configuration of SSL/TLS encryption.

In conclusion, configure browsers to minimally allow TLSv1.1 and configure servers to use TLSv1.2 to be PCI DSS compliant.  The road to TLSv1.1 compatibility and PCI DSS is filled with potholes and death-falls so do it at your own risk.

0

Genymotion and libhoudini.so Error

-

I recently started using Genymotion for emulating an Android image so I could test an app.  To install the app I simply dragged and dropped the apk file into the running Genymotion VM of the phone.  But for some reason the app just kept crashing with the error “unfortunately, your application has stopped”.

Running the following gave me a ton of output but this was what was the relevant bit:

$ adb -e logcat

java.lang.UnsatisfiedLinkError: Cannot load library: load_library(linker.cpp:750): library “/system/lib/libhoudini.so” not found

What in the world is libhoudini??? Some googling brought me to this post.

According to this I needed an ARM translation library so the app still thinks it’s running on an ARM processor (which it isn’t because it’s running in x86 Virtualbox hypervisor).  Simply drag-n-drop the ARM translation.zip file into the Genymotion VM and boom, you should be good to go!

0

Setting up a Windows 7 Kernel Development Environment

-

If you are writing some Ring0 (or privileged mode code), say something like device drivers in Windows you’d probably be better served with a separate development machine and a deployment machine. This helps you to write poor code and still not lose hair because your development machine blue screens! 🙂

My setup was using a Windows 8.1 development machine and a Hyper-V based Windows 7 machine for debugging. You will need to execute different tasks on the “guest” (Hyper-V based Windows 7 virtual machine) and some other tasks on the development machine.  I followed many of the things from the MSDN blog post here

On your guest machine you would want to setup a named pipe and setup debug settings. To do that this is what you need to do:

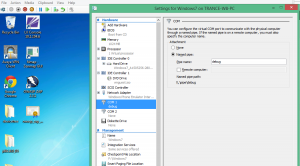
Setup a virtual com port in the Hyper-V Settings (File -> Settings) , this port will be used to communicate from the host machine to the guest to communicate the Kernel debugging commands.
Untitled


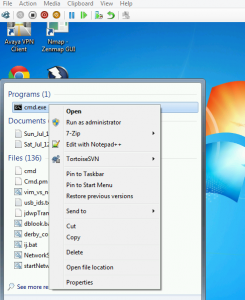
Now make sure that your target guest machine is configured to “listen” those commands.  Inside the guest VM, start a command shell (cmd.exe -> Run as Administrator).

Untitled2


Configure the bcdedit commands so that the machine can now be debugged.  Right after the 2nd command, reboot your Virtual Machine.

Untitled3


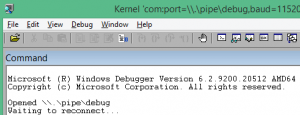
With the VM now configured to listen the debug commands via the COM1 port, and the debug mode on in the bootup settings, now start the WinDbg x64 on the host (using “Run as administrator”; you need administrative privileges for communication via Serial port).  In your kernel debugger on the host or the development machine (I’m assuming that these are both on the same physical hardware here).  Click on File -> Kernel Debug and you should see the following screen in the WinDbg window:

Untitled4

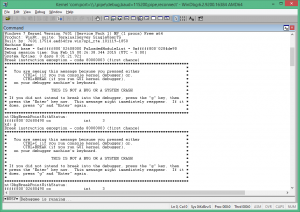
Hit Ctrl+Break or Debug -> Break and you will see something like this:

Untitled5

Just remember that when you break in the debugger, your guest in Hyper-V should become “unresponsive”.  The only thing is that it is not really unresponsive, its just being debugged.  Just to make sure, that you have the symbols package that is quite useful for debugging run the following command:

!process 0 0

If you see something like the following screen show up:

Untitled6

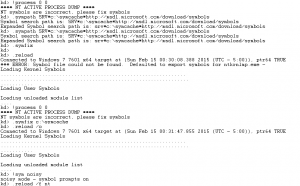
The following error means that the symbols are not defined.  Symbols help the debugger give more information about the commands that you are going to execute in the debugger.

**** NT ACTIVE PROCESS DUMP ****
NT symbols are incorrect, please fix symbols

To fix this, use the following commands:

kd> .sympath SRV*c:\symcache*http://msdl.microsoft.com/download/symbols
kd> .symfix
kd> .symfix c:\symcache
kd> !sym noisy
kd> .reload /o

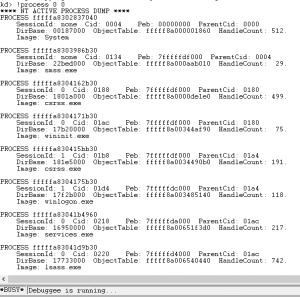
Then again try the command: !process 0 0 and see if you get a good response.  A good response looks like the following:

Untitled7

With this you should be good to go! Happy debugging and writing cool Ring0 code.


5

Proxmark3 Installation on Kali

-

I recently purchased a Proxmark3 from GeZhi Electronics. The proxmark3 client wouldn’t work. In fact the `dmesg` output did not even show the /dev/ttyACM0 device as was said all across the forum. i tried flashing the firmware but kept getting this error:

~/proxmark3/client# ./flasher -b ../bootrom/obj/bootrom.elf 
Loading ELF file '../bootrom/obj/bootrom.elf'...
Loading usable ELF segments:
0: V 0x00100000 P 0x00100000 (0x00000200->0x00000200) [R X] @0x94
1: V 0x00200000 P 0x00100200 (0x00000b38->0x00000b38) [RWX] @0x298
Attempted to write bootloader but bootloader writes are not enabled
Error while loading ../bootrom/obj/bootrom.elf

Also this is what showed up in the dmesg:

[ 7953.991935] usb 2-1.4: new full-speed USB device number 40 using ehci_hcd
[ 7959.078302] usb 2-1.4: New USB device found, idVendor=9ac4, idProduct=4b8f
[ 7959.078314] usb 2-1.4: New USB device strings: Mfr=1, Product=2, SerialNumber=3
[ 7959.078321] usb 2-1.4: Product: ProxMark-3 RFID Instrument
[ 7959.078326] usb 2-1.4: Manufacturer: J. Westhues
[ 7959.078331] usb 2-1.4: SerialNumber: ChangeMe
[ 7959.080485] hid-generic 0003:9AC4:4B8F.0014: hiddev0,hidraw0: USB HID v1.00 Device [J. Westhues ProxMark-3 RFID Instrument] on usb-0000:00:1d.0-1.4/input0

Note that in the above the device doesn’t show up as a /dev/ttyACM0 device which is what we need for the proxmark3 client application to work.
So it seemed like there was an issue with the Proxmark3 not being recognized as a CDC device. So I went through the googlecode repository and went to a version of firmware where CDC was not being used. It also seemed that the flasher was the issue. So I used an old flasher to flash with the latest firmware and boom it worked! Remember to keep the button on the Proxmark3 pressed when you plug it in, and keep holding it down until the firmware update has finished.
Here are the commands:

# svn checkout http://proxmark3.googlecode.com/svn/trunk/ proxmark3
# export DEVKITPRO=$HOME/proxmark3/
# export DEVKITARM=$DEVKITPRO/devkitARM
# export PATH=${PATH}:${DEVKITARM}/bin
# cd proxmark3
# make all
# cd ..
# svn checkout -r 629 http://proxmark3.googlecode.com/svn/trunk/ ~/proxmark3-old-3
# cd proxmark3-old-3/
# make all
# cd client
# ./flasher -b ../../proxmark3/bootrom/obj/bootrom.elf ../../proxmark3/armsrc/obj/osimage.elf ../../proxmark3/armsrc/obj/fpgaimage.elf

And boom! There you … all flashed and now the device is recognized as a /dev/ttyACM0 device.

0

Cisco IPSec VPN Client Reason442: Failed to Enable Virtual Adapter

-

If you use Windows 8 x64 and when you launch the Cisco VPN Client adapter and you see the following error:
Reason 442: Failed To Enable Virtual Adapter Here’s how to fix it.
Open your command prompt in Administrator mode by right clicking at the left lower corner of the screen and going to “Command Prompt (Administrator)”. You will have to log in as an administrator. Launch registry editor by typing “regedit.exe”. Browse to “HKEY_LOCAL_MACHINE\SYSTEM\CurrentControlSet\Services\CVirtA“. In the DisplayName key, you will see something like @oem8.inf,%CVirtA_Desc%;Cisco Systems VPN Adapter. Edit that to just say Cisco Systems VPN Adapter. Try to connect again by launching the VPN Client. It should work!