PCI SSC Forbids SSL and “Early TLS”
On April 15, 2015 the PCI SSC released the PCI DSS v3.1. The main cause for concern for most merchants and other entities (called “entities” hereonforth) that store, transmit and process cardholder data is the prohibition of using SSL and “Early TLS”. The PCI SSC also released a supplement to assist entities in mitigating the issue. The supplement references the NIST guideline SP800-52 rev1 for determining which are good ciphers and which are not.
The key point being what does “Early TLS” mean? Does it mean TLSv1.0 and TLSv1.1 OR does it mean only TLSv1.0? Are the entities supposed to disable all ciphers except anything that’s TLSv1.2?
Answer is (in consultant speak) “it depends”. 🙂
TLSv1.1 does theoretically have ciphers that are not ideal. Example: CBC mode ciphers that are TLSv1.1 but there may be a potential for attacks on them given that in the past couple of years CBC has fallen multiple times (BEAST, POODLE).
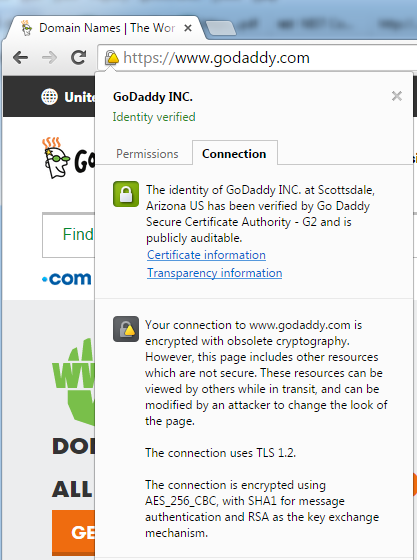
Google Chrome lists the use of CBC-based ciphers (despite the fact that they’re TLSv1.1) to be obsolete. Google Chrome essentially makes “obsolete cryptography” a function of using TLS v1.2-based ciphers.
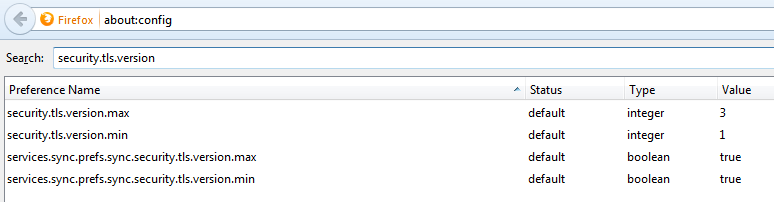
Firefox allows the configuration of disabling TLSv1.0 and that can be done by typing “about:config” in the address bar. The security.tls.version.min = 0 (means SSLv3), 1 (means TLSv1.0), 2 (means TLSv1.1) and 3 (means TLSv1.2). The following screenshot shows the configuration snapshot (here the lowest allowed version is TLSv1.0).
Let’s start with what is definitely ok for PCI:
https://www.openssl.org/docs/apps/ciphers.html#TLS-v1.2-cipher-suites
 TLS_RSA_WITH_NULL_SHA256                  NULL-SHA256
 TLS_RSA_WITH_AES_128_CBC_SHA256           AES128-SHA256
 TLS_RSA_WITH_AES_256_CBC_SHA256           AES256-SHA256
 TLS_RSA_WITH_AES_128_GCM_SHA256           AES128-GCM-SHA256
 TLS_RSA_WITH_AES_256_GCM_SHA384           AES256-GCM-SHA384

 TLS_DH_RSA_WITH_AES_128_CBC_SHA256        DH-RSA-AES128-SHA256
 TLS_DH_RSA_WITH_AES_256_CBC_SHA256        DH-RSA-AES256-SHA256
 TLS_DH_RSA_WITH_AES_128_GCM_SHA256        DH-RSA-AES128-GCM-SHA256
 TLS_DH_RSA_WITH_AES_256_GCM_SHA384        DH-RSA-AES256-GCM-SHA384

 TLS_DH_DSS_WITH_AES_128_CBC_SHA256        DH-DSS-AES128-SHA256
 TLS_DH_DSS_WITH_AES_256_CBC_SHA256        DH-DSS-AES256-SHA256
 TLS_DH_DSS_WITH_AES_128_GCM_SHA256        DH-DSS-AES128-GCM-SHA256
 TLS_DH_DSS_WITH_AES_256_GCM_SHA384        DH-DSS-AES256-GCM-SHA384

 TLS_DHE_RSA_WITH_AES_128_CBC_SHA256       DHE-RSA-AES128-SHA256
 TLS_DHE_RSA_WITH_AES_256_CBC_SHA256       DHE-RSA-AES256-SHA256
 TLS_DHE_RSA_WITH_AES_128_GCM_SHA256       DHE-RSA-AES128-GCM-SHA256
 TLS_DHE_RSA_WITH_AES_256_GCM_SHA384       DHE-RSA-AES256-GCM-SHA384

 TLS_DHE_DSS_WITH_AES_128_CBC_SHA256       DHE-DSS-AES128-SHA256
 TLS_DHE_DSS_WITH_AES_256_CBC_SHA256       DHE-DSS-AES256-SHA256
 TLS_DHE_DSS_WITH_AES_128_GCM_SHA256       DHE-DSS-AES128-GCM-SHA256
 TLS_DHE_DSS_WITH_AES_256_GCM_SHA384       DHE-DSS-AES256-GCM-SHA384

 TLS_ECDH_RSA_WITH_AES_128_CBC_SHA256      ECDH-RSA-AES128-SHA256
 TLS_ECDH_RSA_WITH_AES_256_CBC_SHA384      ECDH-RSA-AES256-SHA384
 TLS_ECDH_RSA_WITH_AES_128_GCM_SHA256      ECDH-RSA-AES128-GCM-SHA256
 TLS_ECDH_RSA_WITH_AES_256_GCM_SHA384      ECDH-RSA-AES256-GCM-SHA384

 TLS_ECDH_ECDSA_WITH_AES_128_CBC_SHA256    ECDH-ECDSA-AES128-SHA256
 TLS_ECDH_ECDSA_WITH_AES_256_CBC_SHA384    ECDH-ECDSA-AES256-SHA384
 TLS_ECDH_ECDSA_WITH_AES_128_GCM_SHA256    ECDH-ECDSA-AES128-GCM-SHA256
 TLS_ECDH_ECDSA_WITH_AES_256_GCM_SHA384    ECDH-ECDSA-AES256-GCM-SHA384

 TLS_ECDHE_RSA_WITH_AES_128_CBC_SHA256     ECDHE-RSA-AES128-SHA256
 TLS_ECDHE_RSA_WITH_AES_256_CBC_SHA384     ECDHE-RSA-AES256-SHA384
 TLS_ECDHE_RSA_WITH_AES_128_GCM_SHA256     ECDHE-RSA-AES128-GCM-SHA256
 TLS_ECDHE_RSA_WITH_AES_256_GCM_SHA384     ECDHE-RSA-AES256-GCM-SHA384

 TLS_ECDHE_ECDSA_WITH_AES_128_CBC_SHA256   ECDHE-ECDSA-AES128-SHA256
 TLS_ECDHE_ECDSA_WITH_AES_256_CBC_SHA384   ECDHE-ECDSA-AES256-SHA384
 TLS_ECDHE_ECDSA_WITH_AES_128_GCM_SHA256   ECDHE-ECDSA-AES128-GCM-SHA256
 TLS_ECDHE_ECDSA_WITH_AES_256_GCM_SHA384   ECDHE-ECDSA-AES256-GCM-SHA384

 TLS_DH_anon_WITH_AES_128_CBC_SHA256       ADH-AES128-SHA256
 TLS_DH_anon_WITH_AES_256_CBC_SHA256       ADH-AES256-SHA256
 TLS_DH_anon_WITH_AES_128_GCM_SHA256       ADH-AES128-GCM-SHA256
 TLS_DH_anon_WITH_AES_256_GCM_SHA384       ADH-AES256-GCM-SHA384
TLS_ECDHE_ECDSA_WITH_CAMELLIA_128_CBC_SHA256 ECDHE-ECDSA-CAMELLIA128-SHA256
TLS_ECDHE_ECDSA_WITH_CAMELLIA_256_CBC_SHA384 ECDHE-ECDSA-CAMELLIA256-SHA384
TLS_ECDH_ECDSA_WITH_CAMELLIA_128_CBC_SHA256 ECDH-ECDSA-CAMELLIA128-SHA256
TLS_ECDH_ECDSA_WITH_CAMELLIA_256_CBC_SHA384 ECDH-ECDSA-CAMELLIA256-SHA384
TLS_ECDHE_RSA_WITH_CAMELLIA_128_CBC_SHA256 ECDHE-RSA-CAMELLIA128-SHA256
TLS_ECDHE_RSA_WITH_CAMELLIA_256_CBC_SHA384 ECDHE-RSA-CAMELLIA256-SHA384
TLS_ECDH_RSA_WITH_CAMELLIA_128_CBC_SHA256 ECDH-RSA-CAMELLIA128-SHA256
TLS_ECDH_RSA_WITH_CAMELLIA_256_CBC_SHA384 ECDH-RSA-CAMELLIA256-SHA384
Now let’s see what may potentially be good from TLSv1.1 perspective (from NIST SP8000-52 rev1):
TLS_RSA_WITH_3DES_EDE_CBC_SHA           DES-CBC3-SHA
TLS_RSA_WITH_AES_128_CBC_SHA            AES128-SHA
Here’s a problem though per OpenSSL man page:

If you’re using OpenSSL, how do you ensure that the browser is not negotiating the vulnerable TLSv1.0 ciphers? The only real answer seems to be by providing a cipher order for negotiation and hoping the client doesn’t cheat. Most likely, the browser will negotiate a better cipher when it exists in the server and on the client and you’d avert the possibility of negotiation of a bad cipher.
According to experts, anything that uses CBC is inherently broken. But disabling TLSv1.0 may make the server inaccessible to various older Android devices. Also, if you’re using older Java Development Kits (JDK7 and below), do remember that the default ciphers may not hit the spot for PCI.
There’s an excellent site to help you configure each type of the server so you could become PCI compliant. This is an excellent site by Ivan Ristic to test your Internet-facing servers for configuration of SSL/TLS encryption.
In conclusion, configure browsers to minimally allow TLSv1.1 and configure servers to use TLSv1.2 to be PCI DSS compliant. The road to TLSv1.1 compatibility and PCI DSS is filled with potholes and death-falls so do it at your own risk.